Suppose you want to transfer some files between servers on a Linux system. There are many ways you can accomplish the task, but if your priority is to transfer files securely, you’re left with a few options. The easiest solution is to use the scp or secure copy command to transfer your files without worrying about security. In this article, we will explain how to use transfer files securely using the scp command on your Linux system.
Transfer Files with scp Command in Linux (2023)
What is scp Command in Linux
When it comes to transferring files over a secure network, the scp command can be very useful. It stands for Secure Copy Protocol and transfers files and directories between two systems over SSH (Secure Shell) connection. With ssh, you can be assured of the security of your files as they are encrypted by default. In simpler terms, the scp command is a more secure version of the cp command, which you can read all about in our Linux Terminal commands article.
How to Use the scp Command: Syntax & Options
Before we can transfer files via scp, let us see the syntax and options of the command right here:
scp
Understanding the syntax:
- First,
- Second,
If you leave either of the above parameters, the scp command in Linux will first look for the file and then copy the file locally. Some of the options to pair with the command are:
| Options | Destination |
|---|---|
-P |
Specifies which port to connect with the host system. If omitted, then it’ll use port 22 by default. |
-p |
Preserves modification times, access times, and modes from the original file when copied to the target system. |
-r |
Copies the entire directory to the target system recursively. |
-J |
Used to connect the source system and destination system via a proxy system (jump host). |
-3 |
when this flag is used, it copies the files to both the target system as well as the local system |
-4 |
forces the scp command to use only IPv4 addresses. |
-6 |
forces the scp command to use only IPv6 addresses. |
How to Copy Files Using the scp Command
Before using the scp command in Linux, there are some prerequisites that you need to fulfill on both the host and target systems:
- ssh should be installed
- root access or any user with sudo privileges
Copy Files from Local Host to Remote Target
If you have a file you need to transfer from your local system to a remote target, you need to use the following syntax:
scp
If the above syntax may seem complicated, an example will clear it out:
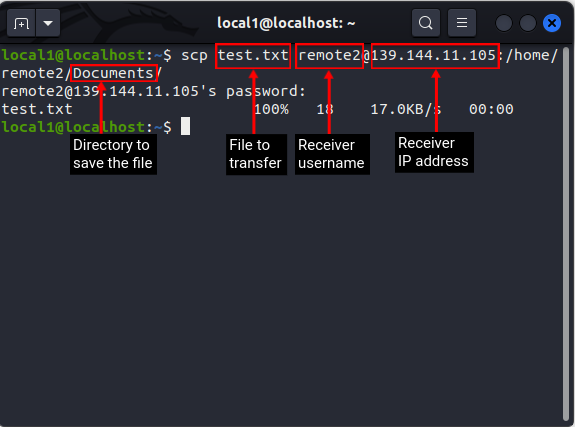
scp test.txt [email protected]:/home/remote2/Documents/
In the above example:
test.txtis the name of the file to be transferred and it’s located in the current directory of the local system.test139.144.11.105is the IP address of the target system./home/remote2/Documents/is the location on the target system where the transferred file will be saved.
Copy Files from Remote Host to Local Target
If you need to transfer a file from a remote host to your local machine, use the following scp command syntax on your Linux system:
scp
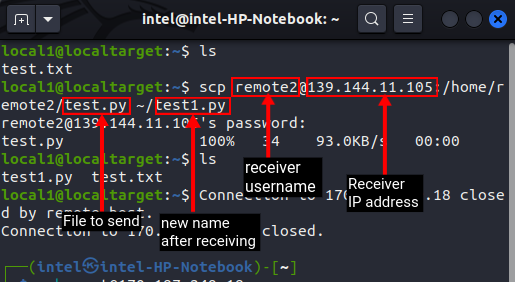
For example, let’s say you need to transfer a file named test.py from the remote server you are working on, use this command:
scp [email protected]:/home/test/test1.py ~/test1.py
In this example:
test10.10.11.113is the remote host IP address./home/test/test1.py~/test1.pyis the name of the file after it is transferred to the local machine and stored in the home directory.
Transfer Files from One Remote Host to Another Remote Target
With the scp command, you can not only transfer files between your local system and a remote machine but also transfer files between two remote systems. But, before you can transfer files from one remote system to another remote system, it’s recommended to generate a private ssh key and a public ssh key on the source system and store a copy of the public key in the destination system.
Generally, users complain about the “Host key verification failed” error when transferring files between two remote systems. To bypass the error, use an ssh-key as an added measure. We have explained how you can do that right here:
1. Generate a public/ private key pair on the source server with this command:
ssh-keygen -t
2. For encryption algorithms, you can use “rsa,” which is the most commonly used algorithm or any other algorithm of your choice.
3. Then, you will be asked to choose the location to store the ssh key. You can either store it at any location of your choice or in the default location.
4. For the passphrase, you can enter anything of your choice or leave it blank by pressing Enter.
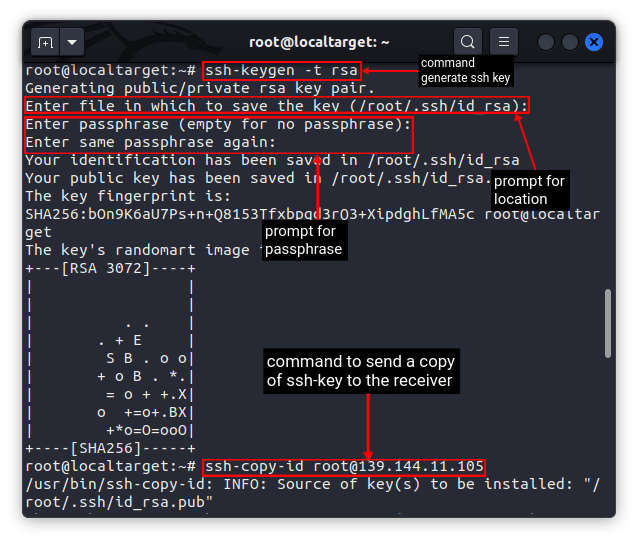
5. Then, copy the public key to the destination server using the command below. With this, you can even log in to the destination system without a password using ssh.
ssh-copy-id
Note: the passwordless method of logging in will only work for the user for which you have generated the ssh-key.
6. Once you have created and stored the ssh key on the remote server, use this scp command syntax to exchange files between two remote systems running Linux:
scp
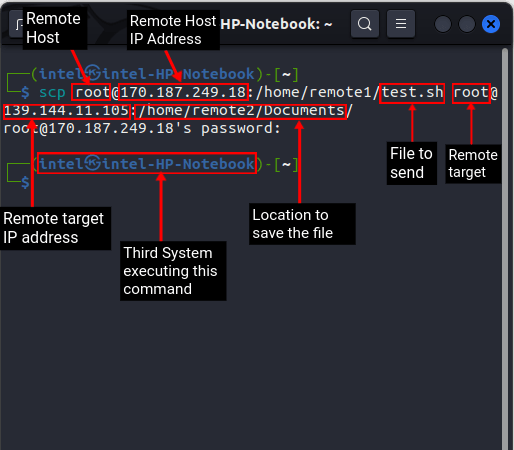
Let’s say you need to transfer a file named test.txt from one remote host to another remote receiver, use the command:
scp [email protected]:/home/test1/test.txt [email protected]:/home/remote2/Documents/test1.txt
In this example:
remote1is the name of the user in the remote sender host10.10.11.113is the IP address of the remote sender host/home/test1/test.txtis the path to the file to be sentremote2is the name of the user in the remote receiver target10.11.27.111is the IP address of the remote receiver target/home/remote2/Documents/test1.txtis the name and path to be saved for the file to be received.
Transfer Multiple Files Using the scp Command
Transferring multiple files one by one can be a tedious task for anyone. Instead, you can use the syntax below to exchange files using the scp command on Linux:
scp
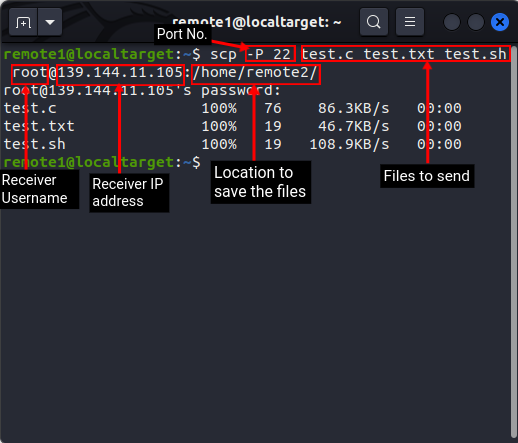
For example – Suppose you need to send four files, including test1.txt, test2.py, test3.sh, and test4.c, to a remote receiver, you can use the command below:
scp -P 22 test1.txt test2.py test3.sh test4.c [email protected]:/home/remote_1/Documents
Let’s understand how the command in the example works and what it does:
-p 2222is used to specify to connect via port 22test1.txt test2.py test3.sh test4.care the name of the files to be transferredremote_1is the username of the receiving system10.10.11.113is the IP address of the receiver/home/remote_1/Documentsrefers to the path to store the received file.
You can even use wildcards to send multiple files with the same extension as shown below:
scp
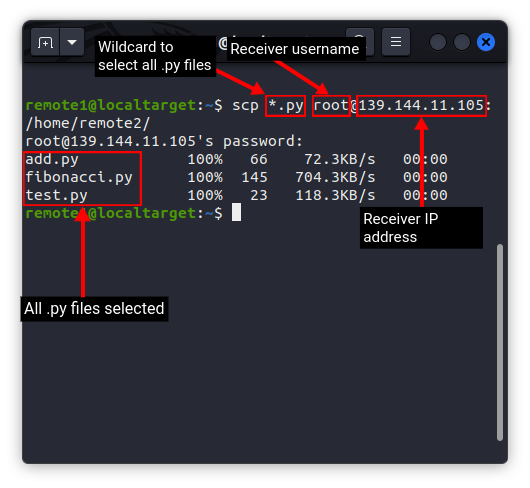
For example, if you need to send all .py files to a remote server, use the below scp command in the Linux Terminal:
scp *.py [email protected]:/home/remote_1/
Here,
*.pysignifies all python filesremote1is the receiver’s username-
10.10.11.113is the receiver’s IP address /home/remote_1/is the location to store the received file
Frequently Asked Questions
The Secure Copy Protocol or scp is a protocol that is based on SSH technology and uses encryption and authentication for the exchange of files between two hosts. This ensures complete data security and integrity between the two hosts.
Both SCP and SFTP protocols are at par in terms of security. The main advantage of using scp over SFTP is the fast transfer speeds which are especially useful in high-latency networks.
Transfer Files Securely Using scp Command in Linux
At some point in time, every user needs to exchange some files over the network. The scp command makes it easy to transfer files securely and efficiently even on a high-latency network. Surely, knowing the various scp options and syntax can be useful too. You can also refer to our guides on how to rename a file in Linux and how to delete a file in Linux to further improve your file management skills on the OS. We hope this article helped you learn how to use the scp command for transferring files on Linux computers. If you face any issues while using the command, do let us know in the comments section.


